

How to Grow Oyster Mushrooms at Home: Easy Guide
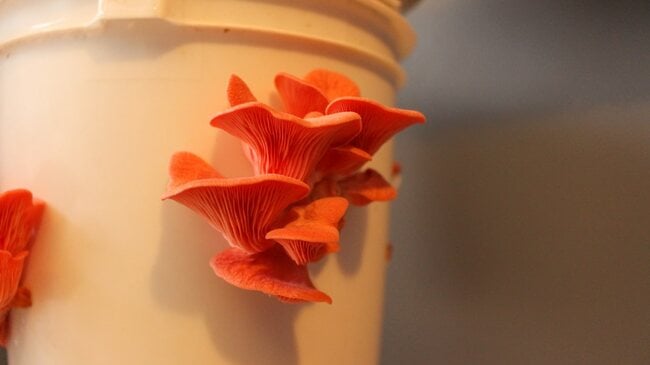
Quick Reference: Growing Oyster Mushrooms
- Best for beginners: pink oyster mushrooms. Forgiving, fast, and hardy against contamination.
- Conditions they like: 60 degrees or warmer, with 80 to 90 percent humidity.
- Easiest start: a growing kit, or grain spawn made from cooked brown rice in a bag.
- Timeline: 2 to 3 weeks for the mycelium to colonize, then 1 to 2 weeks to fully formed mushrooms.
- Where: indoors year-round, or outdoors from early May to mid-October in a Zone 5b climate.
- One rule: always cook oyster mushrooms before eating them.
Are you fascinated by the idea of growing your own mushrooms? If so, we recommend starting with the oyster mushroom variety, especially pink oyster mushrooms. Growing mushrooms is not as difficult as you may have heard. You do not need a biology degree or any complicated equipment. Everyone can do it. Pink oyster mushrooms taste like bacon and add a touch of color to any dish. Follow our simple guide below, and tell us in the comments if you have any questions along the way.
What Are Oyster Mushrooms?
The oyster mushroom (Pleurotus) is a kind of edible mushroom with a wonderful taste and a tender, velvety texture. They are highly nutritious, offering many health benefits such as essential vitamins, minerals, and immune-boosting and cholesterol-lowering properties. There are several types of oyster mushrooms: Phoenix oyster, pearl oyster, golden oyster, blue oyster, and pink oyster, each with its own distinct color and flavor profile.
Oyster mushrooms are more flavorful than the button mushrooms from a typical grocery store. They are also one of the easiest mushrooms to grow, and are much hardier against contamination than other kinds of mushrooms. For a deeper look at the science of home cultivation, Michigan State University Extension keeps a plain-English guide to growing mushrooms at home that backs up the same basics we cover here.
Oyster Mushroom Folklore
Oyster mushrooms have long been believed to possess magical properties and bring good fortune to those who found them in the wild. They were often seen as a symbol of nature’s generosity, providing nourishment and healing to those who respected and cherished the forest’s bountiful gifts. Like a good deal of the lore we keep at the Almanac, the rule is worth preserving and testing rather than mocking, and there is no harm in a little good fortune while you wait on your harvest.
Note: If you do encounter mushrooms in the wild, only harvest them under the supervision of a skilled forager.
Are Oyster Mushrooms Hard To Grow?
One of the common misconceptions about mushrooms is that they are very difficult to grow, but they are actually quite easy. Most of the guides available seem complicated, but the process is much simpler than it sounds.
Oyster mushrooms are wonderfully forgiving, grow quickly, and taste great. For these reasons they offer a higher chance of success and a positive experience for a beginning mushroom grower. They can also be grown without any special equipment, which keeps getting started inexpensive.
Another misconception is that you need a permanently dark place for them to grow, but that is not the case. It is no more difficult to grow mushrooms than it is to grow a plant, although the process is quite different.
Methods For Growing Mushrooms At Home
There are many techniques and substrates that vary across different types of mushrooms. You will need either a mushroom culture, spores, mushroom tissue, or mushroom spawn to grow mushrooms at home. One of the easiest ways is to use a mushroom growing kit. (See below.)
Can You Grow Mushrooms From Store Bought Ones?
Yes, you may grow mushrooms from store bought ones, but it can be a bit hit or miss. You always have a bit more risk of contamination on your grow simply because they have been sitting on a shelf in a public place for some amount of time, but many people successfully grow mushrooms this way.
There are a variety of methods, but the most common one is to put slices of your chosen mushrooms in a bucket, alternating with layers of pasteurized straw, instead of using grain spawn. The mycelium (a network of fungal threads) will continue growing from the mushroom to colonize the straw, and then you would proceed as usual when it is time for them to go into the fruiting phase. (Explained more below.)
What Plant Hardiness Zone Might Be Best For Them?
Southern states have an advantage because they have year-round warmth and humidity. Oyster mushrooms prefer 60 degrees or warmer temperatures and 80 to 90 percent humidity. However, if you live in the Midwest and have a Plant Hardiness Zone of 5b, for instance, you should be able to grow mushrooms outdoors from early May until mid-October. Growing mushrooms indoors lets you grow year-round in any climate. (See below for more information on this.)
Because the trigger is warmth and humidity rather than a calendar date, your outdoor window shifts with your region. Here is a rough guide to when folks across the country can grow oyster mushrooms outdoors. Indoors, the season is always open.
| USDA Zone | Climate character | Outdoor log or stump growing | Indoor growing considerations | Best season |
|---|---|---|---|---|
| 3-5 | Cold winters (below -20 to -10 degrees F); warm humid summers; distinct four seasons | Viable on stumps and totems spring through fall. Fruiting occurs naturally when ambient temps reach 50-65 degrees F. Mycelium survives winter dormancy in buried logs. Pest pressure from flies is lower in northern climates. (Cornell Small Farms Program) | Indoor growing extends the season into winter. An unheated garage or basement in fall naturally drops into the 50-60 degree F fruiting range without added cooling. (University of Vermont Extension) | Spring (May-June) and fall (September-October); summer heat can suppress fruiting if temps climb above 75 degrees F consistently |
| 6-7 | Moderate winters; warm humid summers; reliable spring and fall cool periods | Good outdoor conditions in spring and fall. Zones 6-7 offer the longest natural fruiting windows (April-May and September-November) at ideal temps. Stumps and totems fruit more reliably than horizontal buried logs due to better airflow and lower fly-larvae pressure. (Cornell Small Farms Program) | Basement or climate-controlled space useful for summer production when outdoor temps exceed 75 degrees F. Supplemental humidity (85-95% RH) is the main indoor requirement. (Field and Forest Products) | Spring and fall; two strong fruiting windows per year make zones 6-7 among the most productive for outdoor oyster growing |
| 8-9 | Mild winters; hot humid summers; cool season runs October through March | Outdoor fruiting shifts to fall and winter (October through February), when temps naturally fall into the 50-65 degrees F range. Summer outdoor growing is not viable when daytime highs regularly exceed 85-90 degrees F. (Field and Forest Products) | Climate control required for summer production; cooling costs make year-round indoor growing more practical for hobbyists than for commercial growers. A cooled basement or dedicated fruiting chamber is the standard solution. (Cornell Small Farms Program) | Fall through early spring (October-March); summer outdoor growing is not practical due to heat |
| 10 and above | Subtropical to tropical; rarely below 40 degrees F; heat and humidity dominate most of the year | Outdoor log and stump growing is limited to the coolest months (December-February) when temps briefly dip toward 60-65 degrees F. High humidity supports competing molds that can outcompete Pleurotus ostreatus on unprotected substrates. (Field and Forest Products) | Indoor climate-controlled growing is the primary viable method. Air conditioning to hold the fruiting chamber at 60-65 degrees F is essential. Pink oyster (Pleurotus djamor), which fruits at 65-85 degrees F, is often a better species choice for zone 10 and above than P. ostreatus. (University of Vermont Extension) | December through February for outdoor attempts; indoor year-round with cooling equipment |
Using A Pink Oyster Mushroom Growing Kit
Mushroom growing kits are a great way to dive into mushroom growing without the overwhelming experience of doing all the research on how to grow them and tracking down the correct culture. Here is how to use one.
1. Cook Brown Rice
For your first attempt, we recommend cooking two cups of brown rice for your “mushroom spawn.” Cook until it is fairly dry rather than moist. When the rice is still hot, put it into a plastic bag, squeeze out excess air, zip it shut, and let it cool.
2. Add Your Oyster Mushroom Culture
Once it is cool, open the bag a tiny bit, add a bit of liquid culture (1 milliliter is generally adequate for up to a gallon sized bag) and zip the bag shut again. Next, cut off a corner and tape it shut with paper bandage tape. This creates a filter that allows just enough fresh air exchange for the mycelium to colonize the rice.
3. Wait Patiently
Let this set for 2 to 3 weeks, until the rice is covered with white mycelium. Once it is fully covered, you have officially got a bag of grain spawn to use and you can move on to the next step. (Note: If you start seeing green, blue, red, or black colors instead of white, that means the batch has been contaminated, and it is best to toss it out and start another bag. However, this rarely happens with oyster mushrooms.)
4. Cut An “X” In The Bag
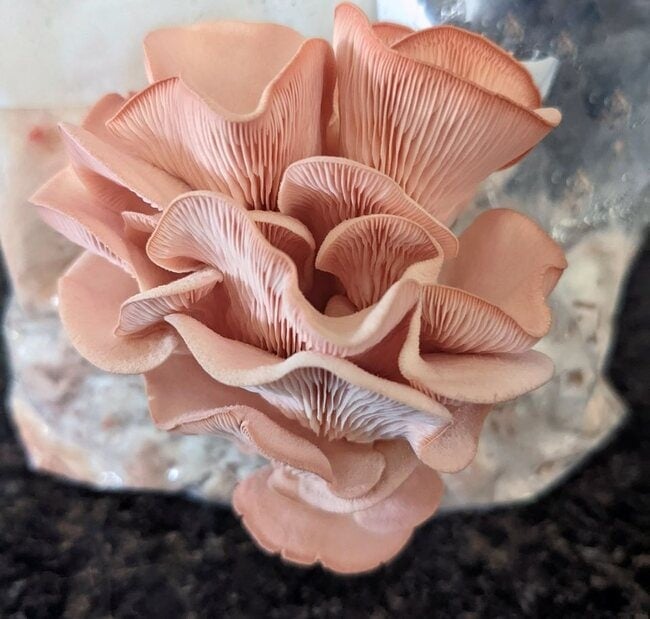
Cut a small X in the front of your rice bag (an inch or so across is good). Mist the area with water and fan it (with a piece of cardboard or whatever you have) for a few minutes a day. The idea is to give it the experience of rain and wind. The fanning helps evaporate the water, which in turn triggers mushroom pinning (baby mushrooms emerging from mycelium).
After about 1 to 2 weeks, you should have fully formed pink oyster mushrooms ready for harvest.
A More Advanced Method
Once you have seen great results with your first attempt and you are ready to try a larger quantity, we recommend cooking 4 to 6 cups of brown rice and using a gallon sized plastic bag (following the same instructions above). The only real difference is that rather than growing directly out of the plastic bag, you have the option to use straw and a bucket (but no larger than a 5 gallon size).
To do this, take enough straw to fit in whatever container you would like to use. Cover it with hot water (boiling is great, but very hot tap water works too). Let it sit until cooled and then drain the water. This kills off germs and hydrates the straw while it is cooling. Then drill holes about 5/16 of an inch in diameter, 8 to 10 inches apart in two rows (also 8 to 10 inches apart) all the way around the bucket you will be growing in.
Get your oyster mushroom project going today. Buy your mushroom growing kit!
Once the straw has cooled, cram the bucket a few inches deep with your hydrated straw, then crumble in a thin layer of the grain spawn you prepared, then another layer of straw, then another layer of crumbled grain spawn, until the whole bucket is full, finishing with a layer of straw on top. For a bucket grow, put the lid on. Use paper bandage tape over the holes on the sides so that everything can breathe but no extra contaminants creep in.
Let this set for 2 to 3 weeks. Once the straw is covered with white mycelium, peel off the paper tape and begin misting and fanning the outside of your bucket daily, as in the rice growing method. After a week or so, tiny pins will emerge. Continue misting and fanning a few times a day, and after a few days, the pins will transform into full sized mushrooms.
When And How Do You Harvest?
While each variety of oyster mushroom has a slightly different shape, you will want to harvest when the cap has a smooth, rounded look to it. If it has grown so long that it has turned all the way up and looks ruffly, it might be getting a bit too far gone and should be picked immediately. (They will start stinking when they begin decomposing, but just do not waste them by letting them sit there and ruffle up.) To harvest them, either use a knife or shears, or grasp them at the base of the stalk and twist to pick them. Remove them neatly and quickly with minimal disruption to the rest of the mycelium.
After you have harvested your mushrooms and growth seems to be stopping, you can rehydrate your bucket, basket, or bag by soaking it in water overnight. (For a 5 gallon bucket, just stick it inside another 5 gallon bucket then fill it up.) Soak it overnight, then drain it and let it sit a day or so. Then begin misting and fanning again.
You will get several harvests this way before it begins really losing steam, at which point you can throw what remains of the myceliated rice (grain spawn) or straw into your compost pile. Chickens love myceliated rice, and there has been a lot of interesting research indicating that it is quite good for them. We just recommend not giving them the leftover myceliated straw, because they love the mycelium and will eat it, but they have a hard time properly swallowing anything with straw in it.
Where To Set Up Your Growing Space
Growing mushrooms at home is a very flexible endeavor that can fit nicely into even the tiniest spaces. If you are timing an outdoor grow alongside the rest of your beds, our Gardening by the Moon Calendar shows the Best Days to work the soil in your region. When you are deciding how you want to grow them, here are a few useful things to consider.
- Rice bags are a great way to grow oyster mushrooms with kids. They can tend to their own little mushroom grow, a wonderful way to introduce young ones to the joy of growing their own food. Oyster mushrooms grow quickly enough to keep the process exciting from start to finish.
- Mushrooms prefer 80 to 90 percent humidity, so if you live in a really dry area, place a plastic tote bag upside-down on top to create a humidity chamber.
- Note: Ventilation is important for larger mushroom grows (anything more than one large bucket). For this reason, if you are growing more than one bucket worth of mushrooms, we recommend growing them outdoors.
- Growing outdoors works great, and you can always stack buckets or hang mushroom bags from an obliging tree. The shade is good (although sun is not bad, just do not let them dry out) and the leaf cover gives them a bit of extra humidity. Straw oyster mushroom beds are a nice addition to any garden.
Eating Oyster Mushrooms
Oyster mushrooms are truly an all-season food that can grow nearly anywhere. They taste great in soups with fresh herbs, onions, and butter. They are also a great side dish stir fried with garlic and seasoned with pepper. You really cannot go wrong with cooking oyster mushrooms. They are versatile and delightful. For more ways to put them to work in the kitchen, see our guide to edible mushrooms and how to cook them.
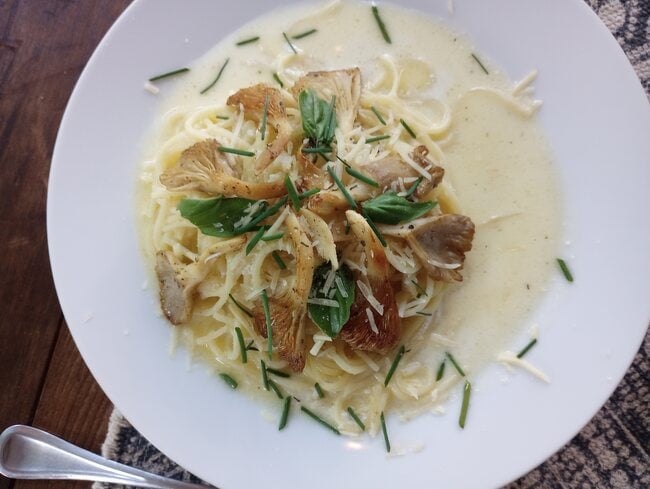
The growing process brings you into a much more hands-on experience with your food, and it is very rewarding to sit down and feast on something so unique that you have grown with your own hands.
What Part Of The Oyster Mushroom Is Edible?
The entire oyster mushroom can be eaten, however the stems tend to be chewier. Stems are best in soups where they will be simmered for quite a while. They also work well as a flavorful topping if you dice them up and stir fry them in butter. The caps have a more universally pleasant texture. Note: Always cook oyster mushrooms before eating them.
Purchase your mushroom growing kit here. Enjoy.

Growing Oyster Mushrooms: Frequently Asked Questions
Are oyster mushrooms hard to grow for beginners?
No. Oyster mushrooms, especially pink oyster mushrooms, are one of the easiest types to grow and are hardy against contamination. They are forgiving, grow quickly, and need no special equipment, which makes them a great first mushroom for a beginner.
How long do oyster mushrooms take to grow?
Plan on 2 to 3 weeks for the mycelium to fully colonize the rice or straw, then another 1 to 2 weeks after you cut the X and begin misting and fanning for fully formed mushrooms ready to harvest. You can usually get several harvests from one grow before it loses steam.
What temperature and humidity do oyster mushrooms need?
Oyster mushrooms prefer 60 degrees or warmer and 80 to 90 percent humidity. If you live in a dry area, set a plastic tote upside-down over the grow to create a humidity chamber. Indoors you can hold these conditions year-round in any climate.
Can you grow oyster mushrooms from store bought ones?
Yes, though it can be hit or miss because store mushrooms carry a higher risk of contamination. The common method is to layer slices of mushroom with pasteurized straw in a bucket. The mycelium grows from the mushroom into the straw, then you fruit it as usual.
Can I grow oyster mushrooms outdoors in my climate?
Southern states have an advantage with year-round warmth and humidity. In a Midwest Zone 5b climate you can grow outdoors from early May until mid-October. Growing indoors lets you grow year-round in any climate, since you control the temperature and humidity.
Do you have to cook oyster mushrooms before eating them?
Yes. Always cook oyster mushrooms before eating them. The entire mushroom is edible, but the stems are chewier and best in soups simmered a while, or diced and stir fried in butter. The caps have a more universally pleasant texture.
Join The Discussion
Did you find this article inspiring and helpful?
Will you try growing your own oyster mushrooms?
Do you have any questions about the process?
Let us know and share with your community in the comments below.
Related Articles
Morel Mushrooms – A Sought After Spring Staple!
10 Edible Mushrooms And How To Cook With Them
Mushroom Coffee? Explore The Health Benefits


Erin Hamilton
Erin Hamilton is a mushroom farmer and agricultural educator based in Howell, Michigan. She founded The Mushroom Conservatory with her husband, Elijah, where they teach people around the world to produce their own food with mushroom growing kits. Erin is passionate about regenerative farmland preservation and loves turning homegrown food into bountiful feasts. A former computer engineer, she fuses new ways of sharing information online with old world skills and traditions.
